Зарубежные варианты
| Внешние изображения | |
|---|---|
| Изображения модификаций Р-8 | |
| A911 — румынская модификация |
Лицензионное производство модификации ракеты с инфракрасной головкой самонаведения под индексом A911 было налажено на предприятиях военно-промышленного комплекса Социалистической Республики Румыния в начале 1989 года, экспорт ракет за рубеж осуществлялся государственной компанией «Ромтехника» в структуре Министерства национальной обороны Румынии. Первые серийные образцы экспонировались 2—6 мая 1989 г. на выставке вооружений «Международная оборона, электроника и авионика» (IDEA ’89) в Анкаре. По заявлению румынской стороны, 90% комплектующих изготавливались на месте и только 10% ввозились из СССР.
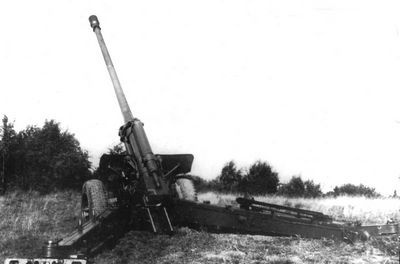
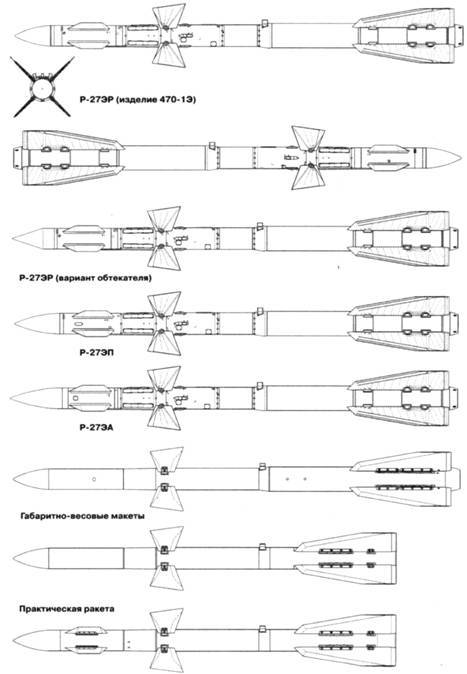
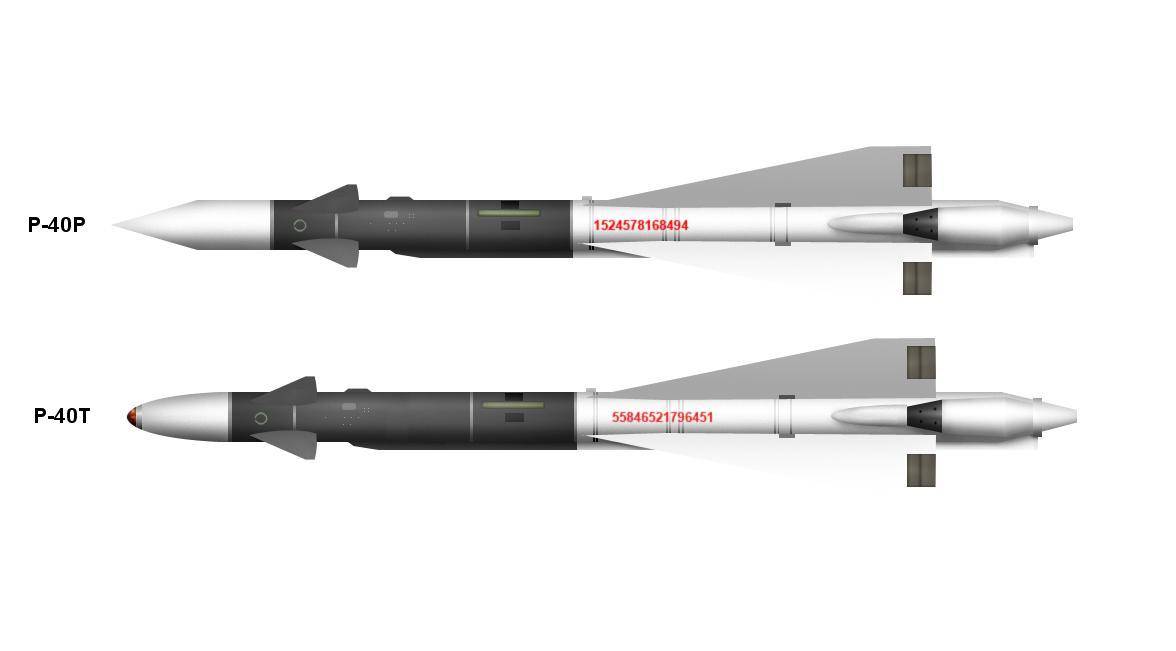
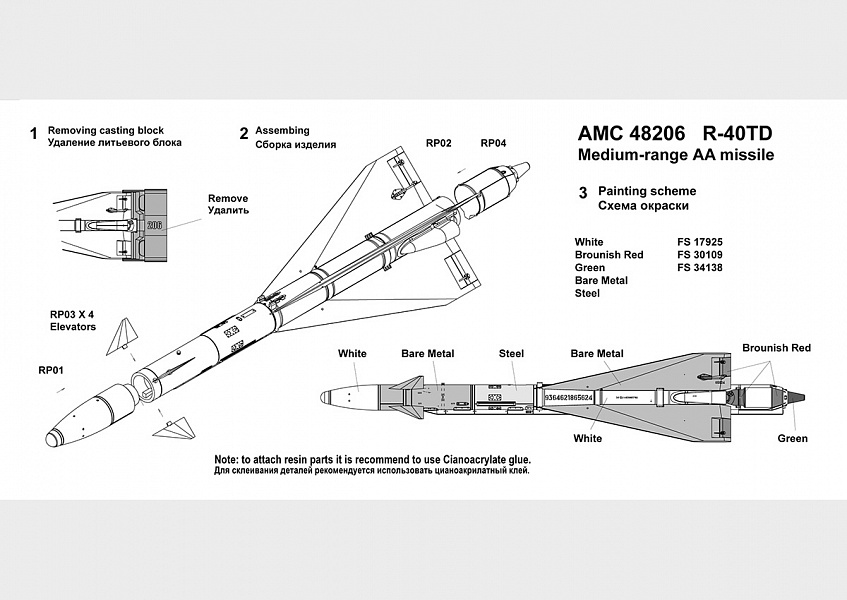
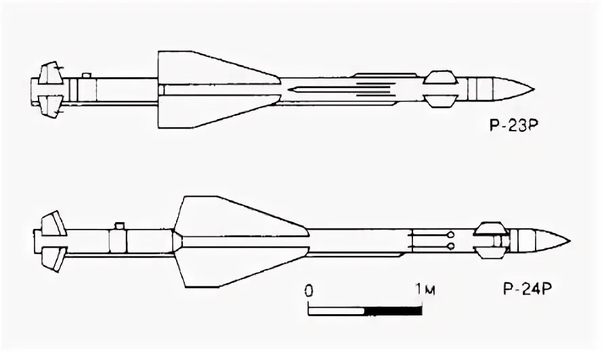
Авиационная ракета большой дальности Р-37 (РВВ-БД)
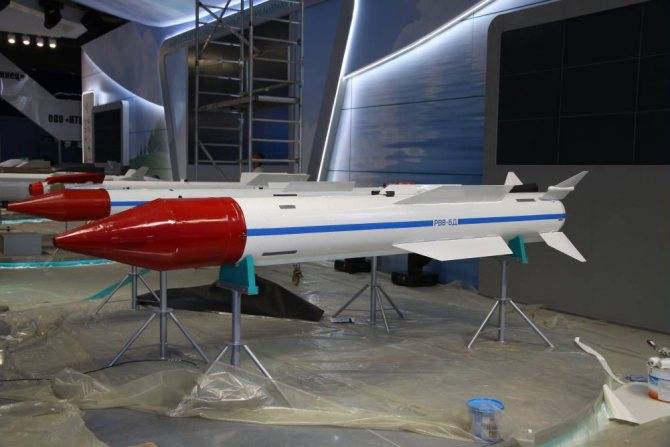
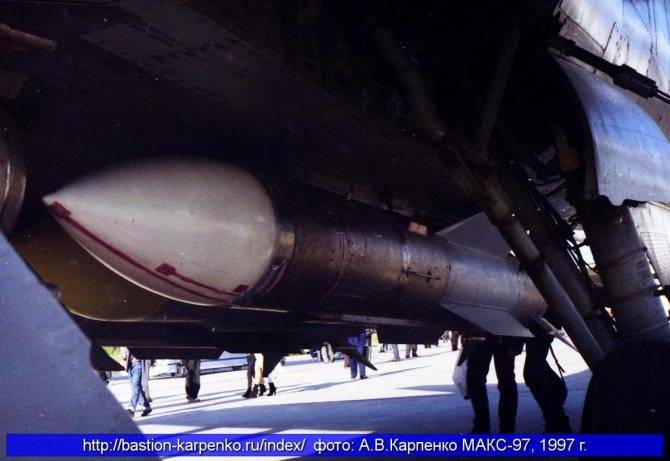
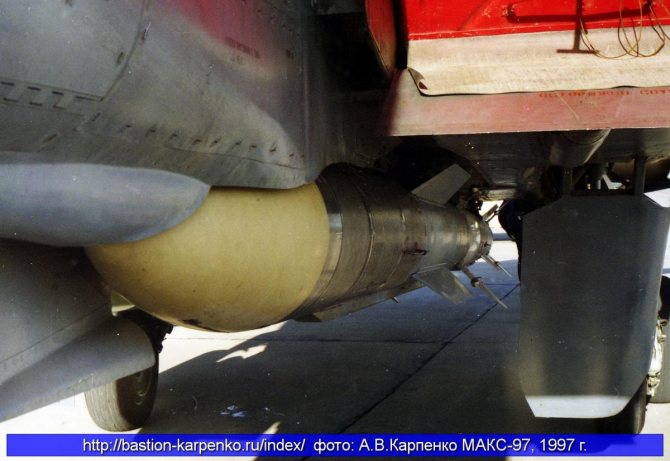
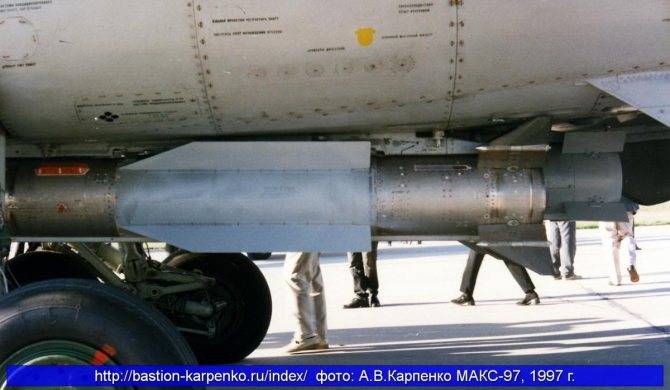
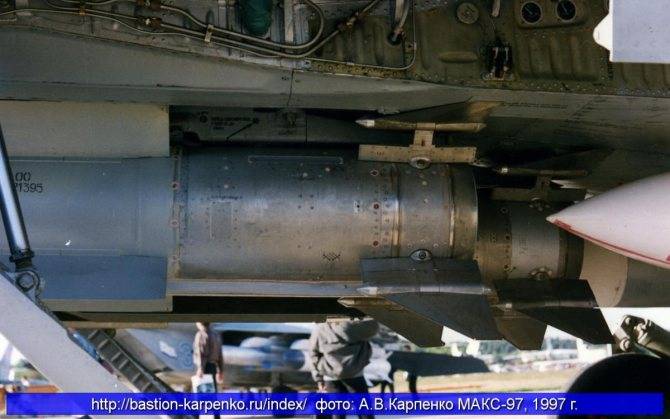
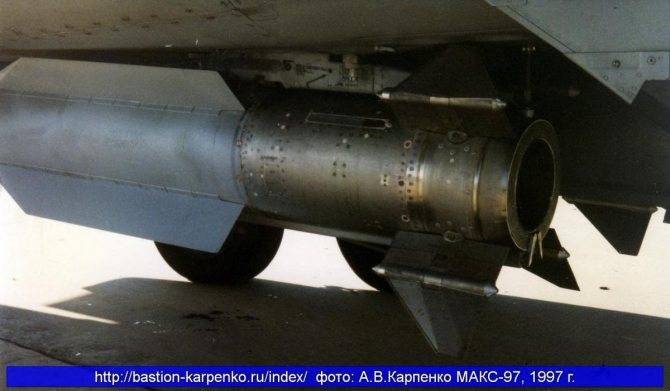
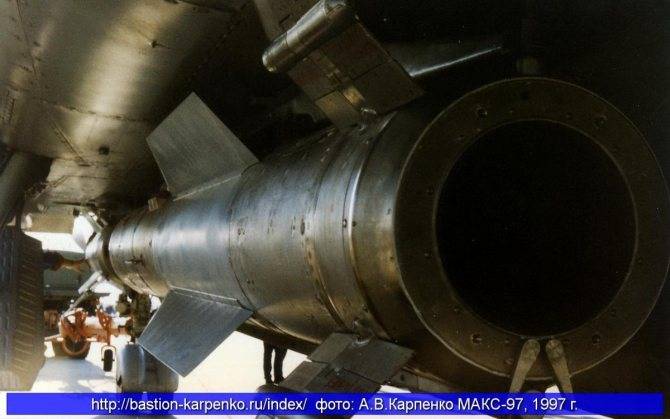
Управляемая авиационная ракета большой дальности Р-37 (К-37,РВВ-БД) предназначена для поражения воздушных целей (истребителей, штурмовиков, бомбардировщиков, самолетов военно-транспортной авиации, вертолетов, крылатых ракет) в любое время суток, на всех ракурсах, в условиях радиоэлектронного противодействия, на фоне земной и водной поверхности, в т.ч. с многоканальным обстрелом по принципу «пустил-забыл».
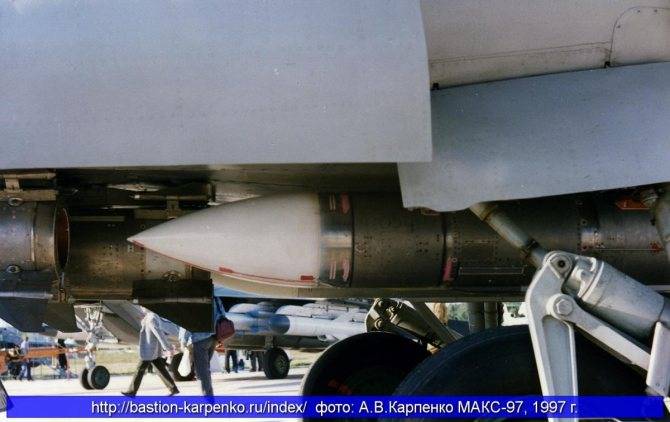
Разработка ракеты К-37 (изделие 610) для вооружения перехватчика МиГ-31М на базе ракеты К-33 была начата ГосМКБ «Вымпел» по Постановлению Совмина СССР от 8 апреля 1983 г. Эскизный проект ракеты был защищен в 1983 г. Первый полет прототипа МиГ-31М (серийный №05-01-01) состоялся 21 декабря 1985 г. Испытания К-37 начаты в 1988 г. автономными баллистическими пусками ракет без системы управления (10 пусков). В 1989 г. в испытаниях участвовали программные ракеты без системы наведения (4 пуска) — совершающие полет под управлением автопилота по программе.
В том же 1989 г. начаты испытания ракет с системой наведения (2 пуска). В апреле 1994 г. была успешно поражена воздушная цель на рекордной дальности — 304 км. Испытания ракеты продолжались до 1997г. После 1997 г. в связи с нарушением кооперации с предприятиями Украины, которые были задействованы в создании систем наведения ракеты, принято решение о разработке системы наведения с использованием только российских компонентов. МиГ-31М с ракетой К-37 был представлен на международном авиакосмическом салоне МАКС-1997 (см.
,
,
,
,
,
,
,
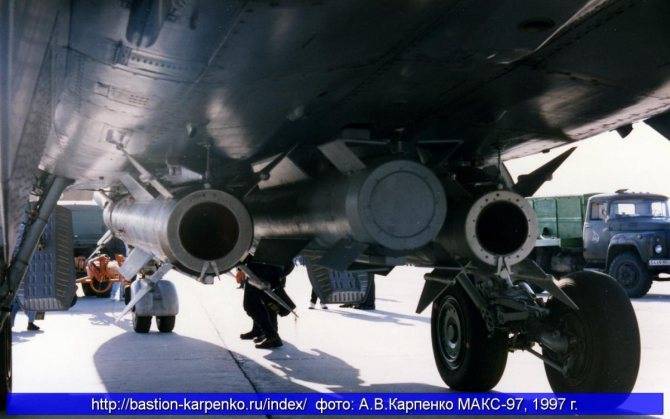
), на вооружение ВВС России не принимался.
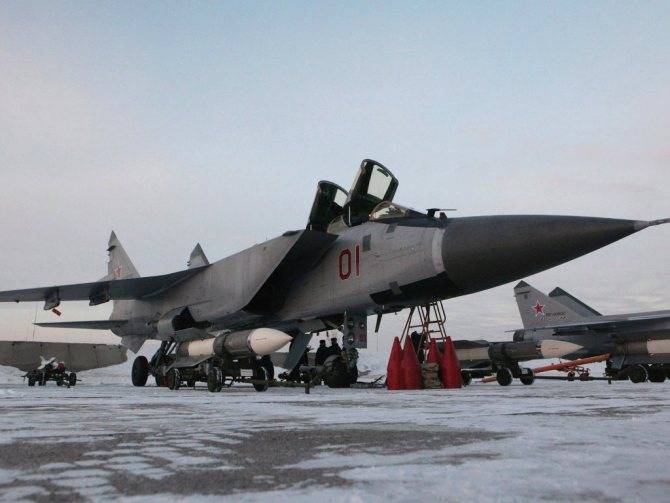
Полученный задел использовался для создания авиационного комплекса перехвата для истребителя-перехватчика МиГ-31БМ. Доработанная ракета, выполненная из российских комплектующих, получила обозначение К-37М (изделие 610М). Под обозначением РВВ-БД (изделие 620) ракета неоднократно выставлялась на выставках военной техники.
Наиболее важным улучшением, по сравнению с предыдущей версией, является применение для К-37M новой системы управления МФБУ-610МШ. Управляемые ракеты К-37М (изделие 610М) впервые были запущены с МиГ-31 в 2011 году и завершили государственные испытания в 2014 году. В настоящее время ракета производится корпорацией КТРВ в г.Королёв, производство бортового комплекса управления поручено Уральскому проектно-конструкторскому бюро «Деталь».
МиГ-31БМ оснащаются новой системой управления вооружением и радиолокационной станцией. Модернизированная система управления оружием РП-31МА «Заслон-АМ» (С-800АМ) с радиолокатором 8БM получила новый компьютер «Багет-55-06» вместо «Аргона-15A». Пассивная антенна с электронным управлением лучом осталась без изменений. Дальность обнаружения модернизированной радиолокационной станции составляет 320 км, автоматическое сопровождение – 280 км (дальность обнаружения истребителя -240 км). Одновременно сопровождаются 24 цели, из них – 6 одновременно обстреливаются ракетами (в прежней версии – 10 и 4 соответственно). Теплопеленгатор 8ТК остался без изменений.
В передней кабине некоторые механические приборы были заменены на жидкокристаллический дисплей, размером 127х127 мм, расположенный с правой стороны приборной панели. Кабина оператора (сзади) получила два больших 152х203 мм ЖК-дисплея вместо электронно-лучевых трубок. Самолёт получил новое связное оборудование (радиостанция Р800Л) и улучшенное радионавигационное оборудование, включая систему спутниковой навигации A737. С крыла исчезли большие пилоны для вооружения (ранее предначавшиеся для ракет Р-40TД), которые были заменены на подвески, достаточные для ракет Р-77-1 или Р-73. Кроме того, на внешних точках подвески, ранее использовавшихся только для подвески дополнительных топливных баков, теперь можно разместить ракеты класса «воздух-воздух». МиГ-31БМ немного тяжелее версии «Б» — максимальная взлётная масса — 46835 кг, а лётные данные практически не изменились, за исключением потолка, который снизился до чуть более 20000 м.
Серийное производство ракеты РВВ-БД началось в 2014г. На западе ракета получила обозначение AA-X-13 Arrow.
Version 1.0
The pressure control handles this free filament length as a spring, where is a spring constant. When the nozzle starts to print a line, it takes the extrusion speed as a reference. Additional to the needed extrusion length for a line segment, which is defined by the slicer, it calculates the needed extra compression of the filament to reach the needed nozzle pressure so that the extrusion length defined by the slicer is really extruded. This is done in every loop of the stepper ISR.
During deceleration, the filament compression is released again by the same formula: . During deceleration, is negative, thus the values is negative which leads to a retract (or slowed) movement, relaxing the filament again.
The basic formula () is the same as in the famous JKN pressure control, but with one important difference: JKN calculates the sum of all required advance extruder steps inside the planner loop and distributes them equally over every acceleration and deceleration stepper ISR loop. This leads to the wrong distribution of advance steps, resulting in an imperfect print result. calculates the extra steps on the fly in every stepper ISR loop, therefore applying the required steps precisely where needed.
For further details and graphs have a look into this presentation, slides 7-9.
In Marlin, all the work is done in the and files. In the planner loop, checks whether a move needs pressure control. This applies only to print moves, not to travel moves and extruder-only moves (like retract and prime).
In the method, calculates the number of extra steps needed to reach the required nozzle pressure. To avoid missing steps, it doesn’t execute them all at once, but distributes them over future calls to the interrupt service routine.
In v1.0 there is no check if the extruder acceleration, speed or jerk will exceed the limits set inside Configuration.h!
Generate Test Pattern
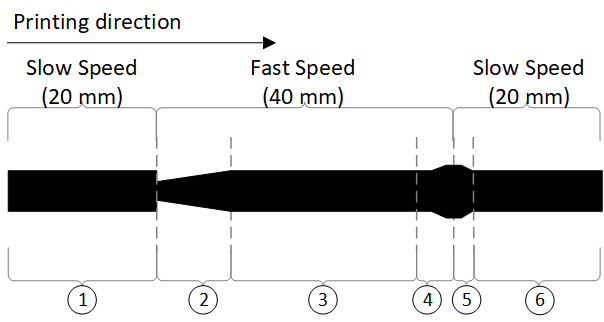
Marlin documentation provides a K-Factor Calibration Pattern generator. This script will generate a G-code file that supports determining a proper K-Factor value. The generated G-code will print a test pattern as shown in the following illustration:
Beginning with the chosen , individual lines will be printed from left to right. Each line consists of 20mm extrusion using being followed by 40mm of and finally being concluded by another 20mm of .
For each new line the K-Factor will be increased by the value, up to the provided .
General considerations for the Test Pattern Settings
- Bowden extruders need a higher K-Factor than direct extruders. Consider a of around 0.1 up to an of around 2.0 for LIN_ADVANCE v1.5 or around 30 up to an of around 130 for v1.0.
- The best matching K-Factor to be used in production depends on.
- Type of filament. Extremely flexible filaments like Ninjaflex may not work at all.
- Printing temperature.
- Extruder characteristics: Bowden vs. direct extruder , bowden length, free filament length in the extruder, etc.
- Nozzle size and geometry.
- The extruder’s steps/mm value has to be . Calibration is recommended at low speeds to avoid additional influences.
- Minimize Backlash caused by gears geared extruder or by push fittings. As it will not influence the K-Factor, it can lead to strange noises from the extruder due to the pressure control.
Changelog
- K is now a meaningful value with the unit [mm of filament compression needed per 1mm/s extrusion speed] or [mm/mm/s].
- Load inside stepper ISR reduced as no calculations are needed there any more. Instead, the extruder runs at a fixed speed offset during pressure adjustment. Therefore this version runs faster.
- LIN_ADVANCE now respects hardware limitations set in Configuration.h, namely extruder jerk. If the pressure corrections require faster adjustments than allowed by extruder jerk limit, the acceleration for this print move is limited to a value which allows to use extruder jerk speed as the upper limit.
- The pressure adjustment moves don’t lead to a rattling extruder as it was in v1.0: as the extruder is now running at a smooth speed instead of jerking between multiples of extruder print speed.
- This smooth extruder operation and respecting of jerk limits ensures no extruder steps are skipped.
Tips, Q&A, Troubleshooting
You might have trouble getting stutter-free scrolling in some games (cf. this bug report). There are a number of things you can try to remedy this:
- In , set to ON.
- In RetroArch’s settings, navigate to and set to OFF.
- Try > > .
- Try setting > > to ON.
- If using a variable refresh rate screen (G-Sync, FreeSync, HDMI 2.1 VRR): navigate to > and set to ON.
Playing with keyboard and mouse
To play not with a gamepad but with keyboard and mouse, be sure to use the ” mode available in RetroArch.
By default, you can toggle game focus by pressing the scroll lock key. While game focus is active, the RetroArch hotkeys are disabled and keyboard presses will not cause RetroPad button presses (which could cause multiple keys to be pressed at once).
You can change the hotkey for game focus mode in RetroArch’s .
ZIP files can be renamed to DOSZ
If your libretro frontend wants to load the content of files instead of sending it to DOSBox Pure to load, the files can be renamed from to .
This is especially useful for CD images in ZIP format which RetroArch refuses to append through its menu. Using an also avoids this problem.
Force opening the start menu
If you have assigned an auto start item in the start menu but want to go back to it, hold shift on the keyboard or L2 or R2 on the gamepad while selecting in the core menu.
Mount ZIP as A or D drive
If you have a ZIP file you want to load as a fake floppy disk or fake CD-ROM, there are multiple options.
- The easiest is to rename the file from to e.g., (to use the D: drive).
- You can also edit the RetroArch playlist file to add a after the file like .
- A third option is available inside DOSBox Pure with a new remount command that can be called with REMOUNT C: D: to remount the C: drive to D:. This can for example be used in a startup batch file.
Change disk label with label command
DOSBox Pure by default uses the first word of the ZIP file name as the label of the mounted disk. Some games require a specific label on a floppy or a CD-ROM so DOSBox Pure offers a new command to change the label of a mounted disk. For example, changes the label of the C: drive.
This label is not saved anywhere and needs to be reapplied on every launch so it’s best to add the command in a startup batch file. You can run the command to check all mounted disks and their disk label.
Save file handling
When modifications to the file system loaded from a ZIP file happen, these modifications are written into a separate save file. You can find these save files inside the data directory of your libretro frontend, usually in a sub-directory called , or any other directory you have set in .
- Save files get re-written to disk a short while after a modification happens in the file system.
- The larger the save, the less often it will be written out.
- Up to 1MB of total save data, it will be written out 2 seconds after the previous file modification. Then gradually until at max 59MB and more, it will be written out 60 seconds after the last file modification.
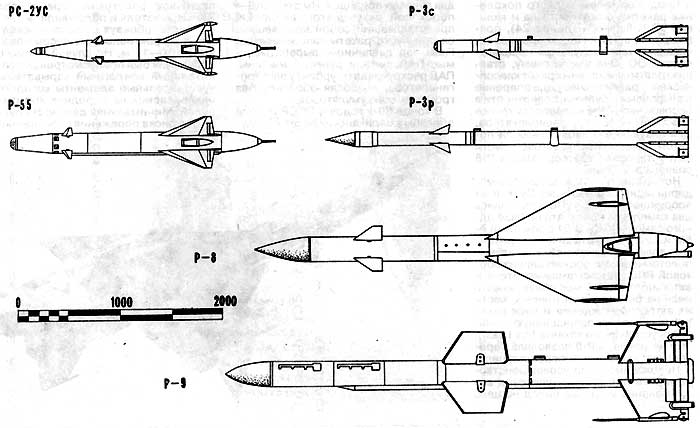
Исторический
В 30 декабря 1954 г.Совет Министров СССР принял постановление 2543-1224 , призывающее к изучению и разработке управляемых ракет класса “воздух-воздух”, с тем чтобы их можно было использовать на перехватчиках.
Разработка К-8 , известного в Красной Армии как « Р-8 » , началась в году в ОКБ, возглавляемых Матусом Бисноватым. Как и большинство советских ракет класса “воздух-воздух”, он был изготовлен с возможностью выбора между или . Оригинальная ракета была совместима с РЛС ” Ураган-5Б ” Су-11 и другими экспериментальными самолетами ” Микоян-Гуревич” .
Хотя R-8 не был сохранен, он служил базой и был модернизирован до стандарта R-8M в 1961 году , что дало оружию возможность прямого поражения. Именно в таком виде ракета поступила на вооружение.Февраль 1962 г.. В году он был усовершенствован , став Р8М1 и теперь совместим с РЛС РП-11 Ориол-Д на Су-15 и Як-28П . Дальнейшее развитие в 1965 году привело к созданию версии Р-8М2 , более известной как Р-98 , с увеличенной дальностью действия и улучшенными датчиками. Это был также совместим с новым RP-11 Орловский-М «Eagle» радара на Су-15 и Як-28P . Последней версией, представленной в 1973 году , стала Р-98М1 (кодовое название НАТО: « Advanced Anab »). Это выгоду от дальнейшего улучшения диапазона, лучшую устойчивость к контрмер , и был совместим с Тайфун-М радары этих Су-15ТМ и перехватчики Як-28PM . Вариант с использованием головки самонаведения ракеты К-13 ( АА-2 Атолл) , обеспечивающий лучшую эффективность в закрученном бою, был разработан в 1960 году, но не был реализован. Он должен был называться К-88 .
R-98M1 оставались на вооружении до середины не -1980s , когда он был выведен из эксплуатации вместе с последними бутыль перехватчиков . Также был разработан инертный вариант, предназначенный для тренировок, получивший название УР-8М .
Running Rootless Servers (Experimental)
Rootless mode allows running K3s servers as an unprivileged user, so as to protect the real root on the host from potential container-breakout attacks.
See https://rootlesscontaine.rs/ to learn more about Rootless Kubernetes.
Known Issues with Rootless mode
Ports
When running rootless a new network namespace is created. This means that K3s instance is running with networking fairly detached from the host.
The only way to access Services run in K3s from the host is to set up port forwards to the K3s network namespace.
Rootless K3s includes controller that will automatically bind 6443 and service ports below 1024 to the host with an offset of 10000.For example, a Service on port 80 will become 10080 on the host, but 8080 will become 8080 without any offset. Currently, only LoadBalancer Services are automatically bound.
Cgroups
Cgroup v1 and Hybrid v1/v2 are not supported; only pure Cgroup v2 is supported. If K3s fails to start due to missing cgroups when running rootless, it is likely that your node is in Hybrid mode, and the “missing” cgroups are still bound to a v1 controller.
Multi-node/multi-process cluster
Multi-node rootless clusters, or multiple rootless k3s processes on the same node, are not currently supported. See for more details.
Starting Rootless Servers
Enable cgroup v2 delegation, see https://rootlesscontaine.rs/getting-started/common/cgroup2/ .
This step is required; the rootless kubelet will fail to start without the proper cgroups delegated.-
Download from .
Make sure to use the same version of and .Install to .
Installing this file as a system-wide service () is not supported.
Depending on the path of binary, you might need to modify the line of the file.Run
Run
Run , and make sure the pods are running.
Advanced Rootless Configuration
Rootless K3s uses rootlesskit and slirp4netns to communicate between host and user network namespaces.
Some of the configuration used by rootlesskit and slirp4nets can be set by environment variables. The best way to set these is to add them to the field of the k3s-rootless systemd unit.
| Variable | Default | Description |
|---|---|---|
| 1500 | Sets the MTU for the slirp4netns virtual interfaces. | |
| 10.41.0.0/16 | Sets the CIDR used by slirp4netns virtual interfaces. | |
| autotedected | Enables slirp4netns IPv6 support. If not specified, it is automatically enabled if K3s is configured for dual-stack operation. | |
| builtin | Selects the rootless port driver; either or . Builtin is faster, but masquerades the original source address of inbound packets. | |
| true | Controls whether or not access to the hosts’s loopback address via the gateway interface is enabled. It is recommended that this not be changed, for security reasons. |
Running K3s in Docker
There are several ways to run K3s in Docker:
- K3d
- Docker
k3d is a utility designed to easily run multi-node K3s clusters in Docker.
k3d makes it very easy to create single- and multi-node k3s clusters in docker, e.g. for local development on Kubernetes.
See the documentation for more information on how to install and use k3d.
To use Docker, images are also available to run the K3s server and agent.
Using the command:
note
You must specify a valid K3s version as the tag; the tag is not maintained.Docker images do not allow a sign in tags, use a in the tag instead.
Once K3s is up and running, you can copy the admin kubeconfig out of the Docker container for use:
Adding the K-Factor to the G-code Start Script
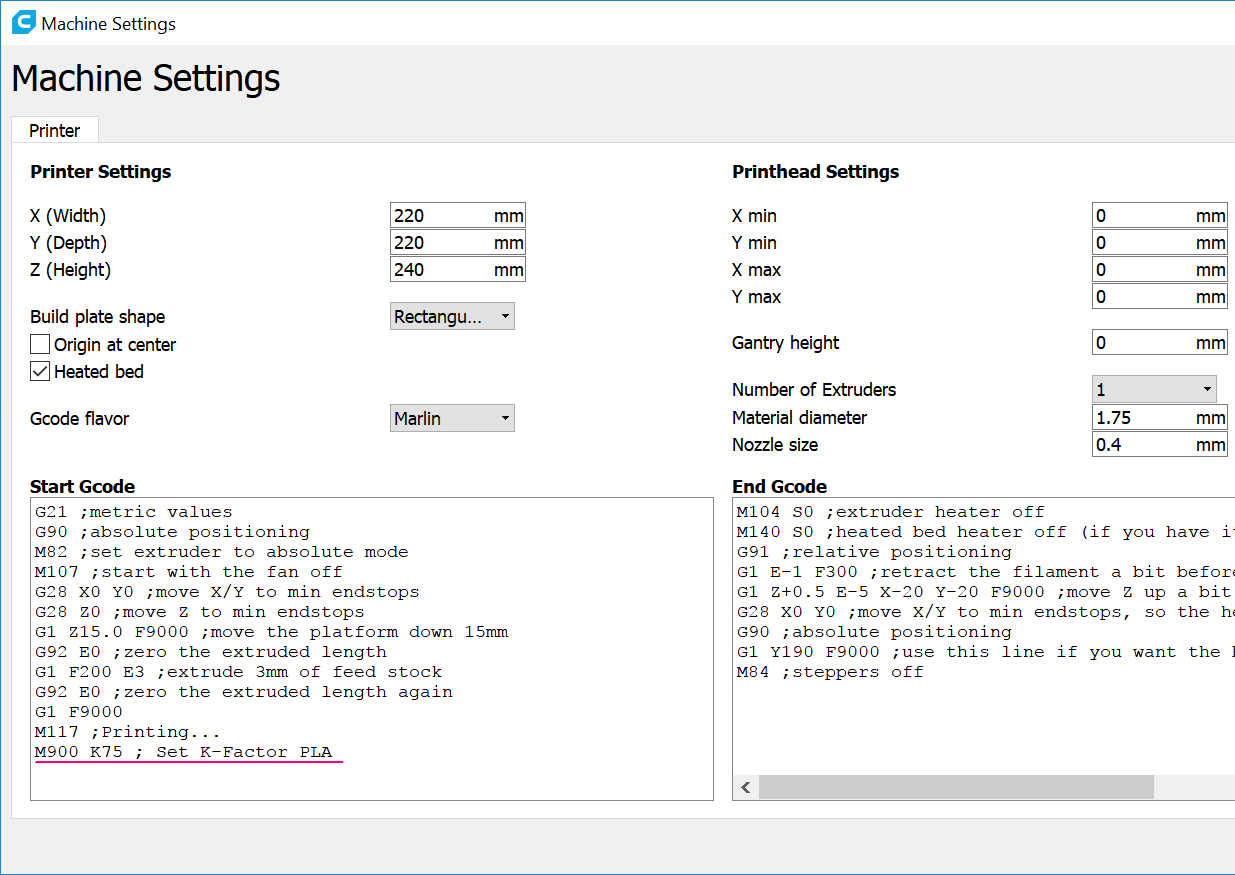
G-code Start Scripts are supported by various slicers. The big advantage of setting the K-Factor via this methods is that it can easily be modified, e.g. when switching to a different material. The K-Factor is defined by adding the command to the end of the start script, where xx is the value determined with the above test pattern.
The following chapter briefly describes where to find the relevant setting in popular slicers.
Note 1:
With the G-code Start Script method, the feature still needs to be activated in the firmware as described in . It is recommended to set to 0, which effectively disables the hard-coded firmware value. In this case only the K-Factor set via the start script is used.
Note 2:
The shown G-code Start Scripts are individual to each printer and personal taste. This is only intended to demonstrate where the K-Factor setting can be applied.
Settings —> Printer —> Manage Printer —> Machine Settings
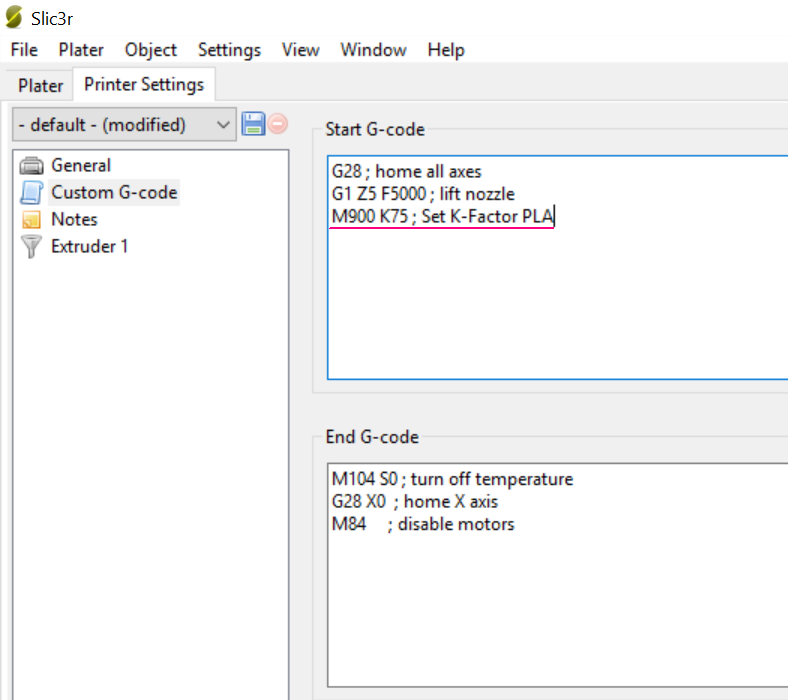
Settings —> Printer Settings —> Custom G-code
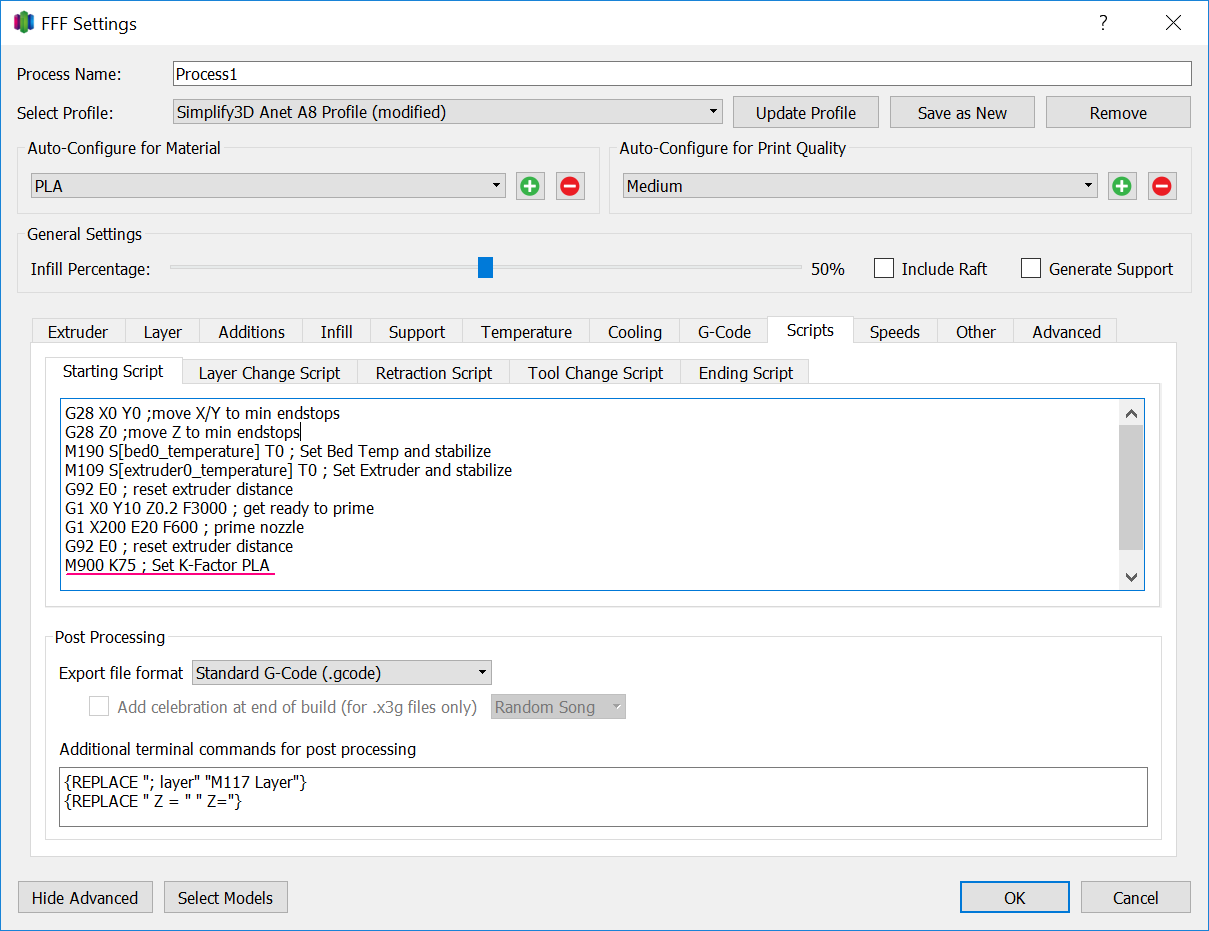
Edit Process Settings —> Show Advanced –> Scripts —> Custom G-code
NVIDIA Container Runtime Support
K3s will automatically detect and configure the NVIDIA container runtime if it is present when K3s starts.
- Install the nvidia-container package repository on the node by following the instructions at:
https://nvidia.github.io/libnvidia-container/ Install the nvidia container runtime packages. For example:
Install K3s, or restart it if already installed:
Confirm that the nvidia container runtime has been found by k3s:
This will automatically add and/or runtimes to the containerd configuration, depending on what runtime executables are found.
You must still add a RuntimeClass definition to your cluster, and deploy Pods that explicitly request the appropriate runtime by setting in the Pod spec:
Note that the NVIDIA Container Runtime is also frequently used with the NVIDIA Device Plugin and GPU Feature Discovery, which must be installed separately, with modifications to ensure that pod specs include , as mentioned above.
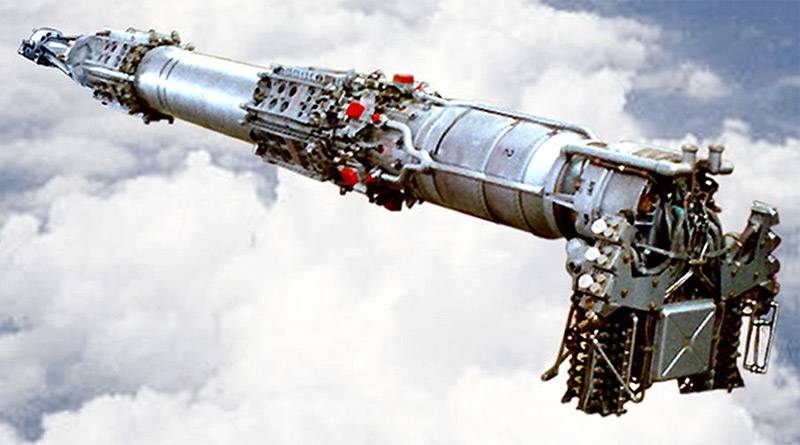
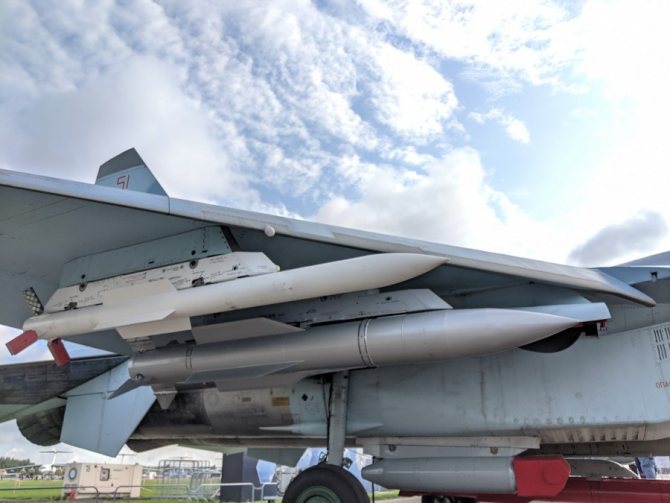
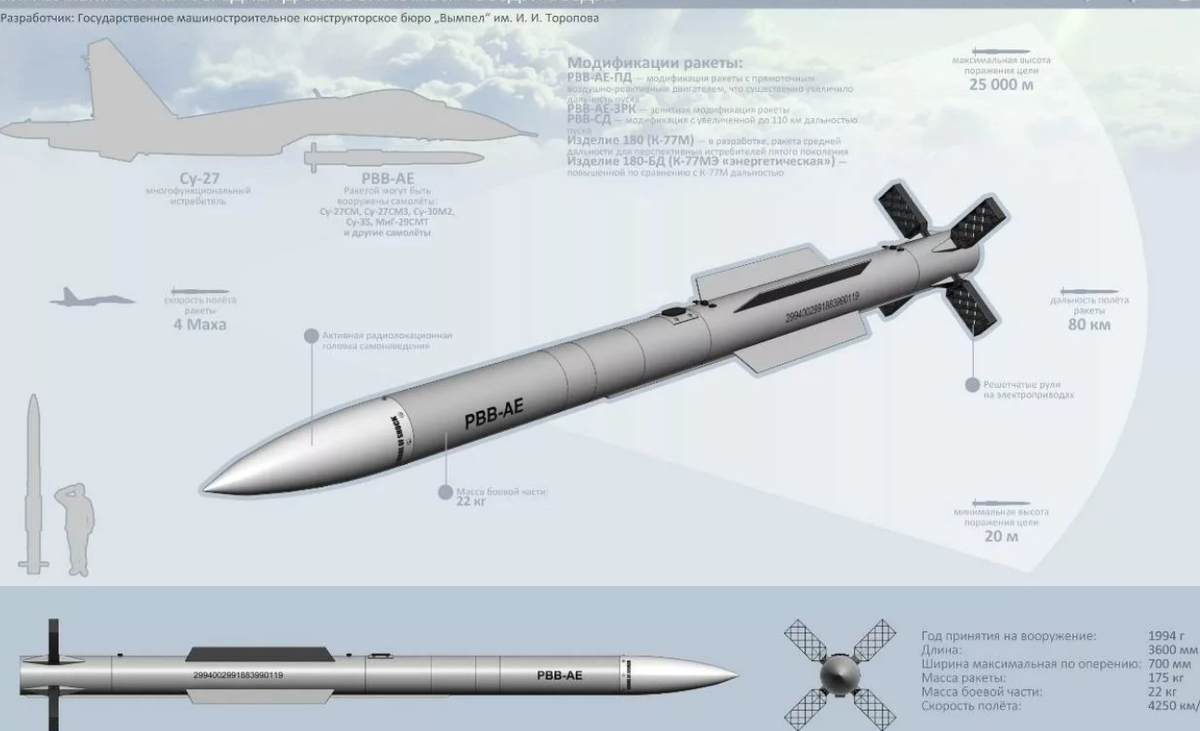
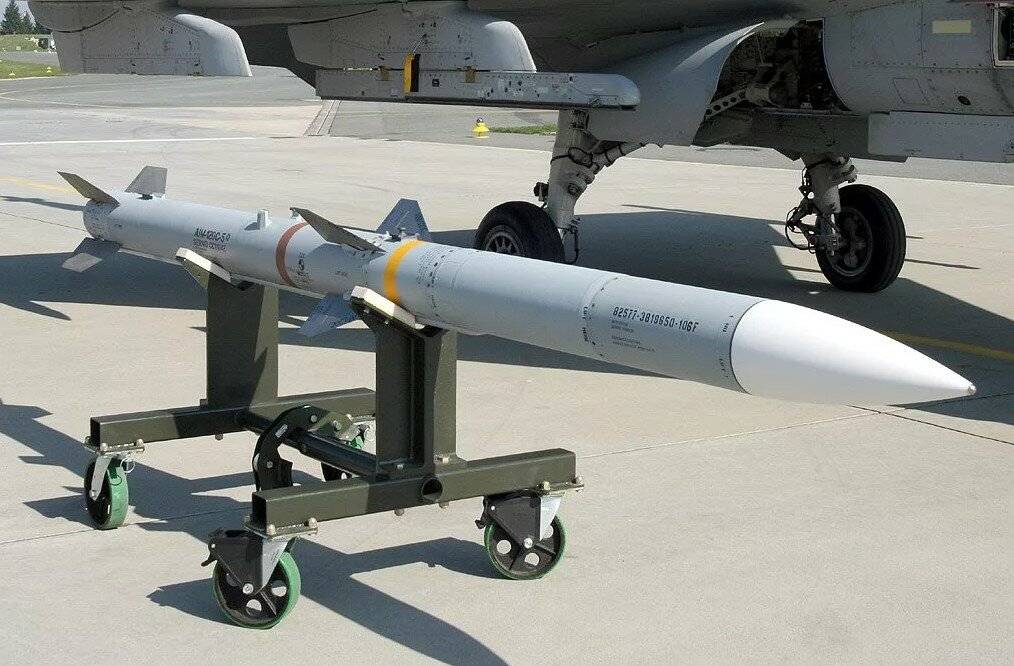
Авиационная ракета Р-77 средней дальности
Проектировалась для истребителя пятого поколения МиГ – 1.42, так и не пошедшего в серию. Западное наименование АА-12 “Adder”. Принята на вооружение в 1994 году. Оснащена мощным двигателем и самыми совершенными радиолокационным и инфракрасным комплексами наведения. Предназначена для уничтожения движущихся и статичных воздушных объектов всех типов, в том числе крылатых ракет, летящих с огибанием рельефа местности, на фоне земли и морской поверхности во всех диапазонах высот. Радиус действия модификации с твердотопливными ускорителями достигает 160 км.


· Масса – 700 кг.
· Длина изделия – 3,5 м.
· Масса стержневой боевой части с мультикумулятивными элементами – 22 кг.
· Максимальная дальность поражения объектов – 100 км.
Evaluating the Calibration Pattern
The transition between phases and phases are the points of interest to determine the best matching K-Factor. Following illustration shows a magnified view of a line where the K-Factor is too low:
| Phase | Description |
|---|---|
| 1 | |
| 2 | Beginning of the . The pressure build up in the nozzle (= amount of extruded material) is lagging behind the acceleration of the print-head. This results in too little material and a starved line. Towards the end of this phase, the pressure is catching up to its intended value. |
| 3 | Extrusion and print-head movement are in sync. The nominal line width is extruded |
| 4 | Beginning of the deceleration towards . Here the opposite of Phase 2 can be observed: The pressure decrease in the nozzle is lagging behind the deceleration of the print-head. This results in too much material being extruded |
| 5 | Beginning of the phase. Still the pressure in the nozzle is not in sync with the intended extrusion amount and the line is suffering from over-extrusion. |
| 6 | has stabilized. |
A too high K-Factor essentially reverses the above picture. The extruded amount will overshoot at the start of an acceleration and starve in the deceleration phase.
Version 1.5
Version 1.5 handles the pressure correction in a slightly different way to reach the following goals:
- respect extruder jerk
- ensure a smooth extruder movement without rattling
- reduce load inside stepper ISR
It does this by calculating an extruder speed offset within the planner for the given segment. If we have a true, linear acceleration then this will execute the needed advance steps just in time, so we have reached all our needed advance steps just when the acceleration part is over. As Marlin uses an approximation for the acceleration calculation inside the ISR, this is not perfectly true, we will come to this later. If the needed speed offset exceeds the allowed extruder jerk, the print acceleration for this segment is reduced to a lower value so extruder jerk is not exceeded any more. This is comparable to the check Marlin does for each axis, for example if we have a print acceleration of 2000mm/s² but X axis max. acceleration is set to 500mm/s², print acceleration is reduced to 500mm/s². During the trapezoid calculation, calculates the needed amount of advance steps at cruising speed and at final speed (=speed at and of the block).
When this block is executed by the stepper ISR, the extruder is set to a frequency which represents the calculated speed offset. The advance step is executed together with normal e steps. During the block runtime, the pressure will be advanced until the precalculated needed extra step amount is reached or the deceleration is started. During deceleration we reduce the advance step amount until we reach the amount for final speed or the block comes to an end. This checks are necessary as Marlin uses an approximation for acceleration calculation as mentioned above. Therefore, for example, we might not reach the final pressure at end of move perfectly but that’s not important as this error will not cumulate.
The next update might include improved handling of variable width moves. On variable width path it’s possible that we need to deplete pressure during acceleration, for example when the next line is much narrower than the previous one. Therefore would need to check for the actual extruder direction needed. Another case to be considered is the gap fill to the tip of a triangle: in this case Marlin will move on with a constant speed, but the extruder speed and therefore needed pressure gets smaller and smaller when we approach the tip of the triangle. We should adapt nozzle pressure with max. possible speed (extruder jerk speed) then. As gap fill is done at quite low speeds by most slicers, we have to decide if that extra load is worth the effect. On 32bit boards where calculation performance is most likely not a problem, it makes sense in any case.